Showing posts with label collage sheet. Show all posts

Wednesday, December 16, 2009

This is What 2,000 Collage Sheets Look Like

I am thrilled to announce that after six months of product testing, research, design, and waaaaay too many late nights, the piddix line of printed collage sheets is finally here. They're printed on a the most amazing paper (which also happens to be FSC certified with recycled content) right here in Portland, Oregon at a 60-year-old family-owned print shop.

These little treats will only be available in retail stores. You can find the full line of 60+ collage sheets at The Bead Monkey in Minnesota, with other locations and details to be announced soon. Swing by their Minneapolis or St. Paul location and tell them piddix sent you.

Wednesday, October 21, 2009

Paper and Ink

Did you miss me? Well, no, you probably didn't. But just in case I'll tell you what has kept me hiding away at my computer for the past two months. My new project involves:
  • 60 custom collage sheets
  • Quotes from 8 printers
  • 20 paper samples
  • Packaging design
  • 23 versions of new layouts
  • Dipping prototypes in glue, water, resins and anything else to otherwise destroy them
And a total lack of sleep while figuring everything out. I don't think I've gone to bed before 2 am once this month. I have such a love/hate relationship with new projects. They can have a huge learning curve, which in many ways I love, but can also be so frustrating at times while I try to figure out the perfect answer.

And no, I haven't told you exactly what I've been up to. I will save that announcement for when I actually deliver the new product to stores. But I can see the light at the end of the tunnel. Check back in a couple of weeks to see how everything turned out.

In the mean time, here's a sneak peek at some of the images from a new Steampunk collage sheet I have been playing around with. Enjoy!

Monday, August 10, 2009

Getting the Most Out of Your Collage Sheets

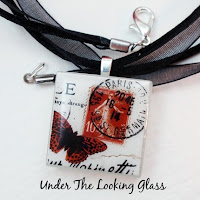
Digital collage sheets by piddix are 8.5x11 inch .jpg files delivered to your email within 24-hours. Most people print them out as-is, cut out the individual images with scissors, and then use them to make beautiful pendants, collages, cards, and other jewelry (see lovely example from Under the Looking Glass on left).

But what if you want an image to fit a particular size or shape that is not offered? With four pretty easy tricks, you can re-size just about any image offered through piddix to fit your needs.

Step 1: Know your "mms"
Many pendant settings are listed in millimeters, while some collage sheets are only listed in inches. One mm equals .039 inches. So to find out a good size for the 25mm pendant tray you just ordered, multiply 25 by .039 to equal .98 inches--so the one inch circle or one inch square sized collage sheets will be the best fit. Here's an online calculator to find the same answers.

Step 2: Use your printer to re-size
One of the ea
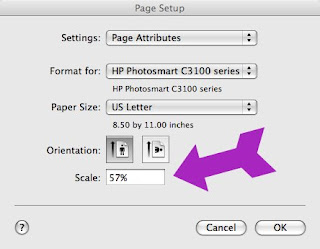
siest ways to re-size an entire sheet is to print the whole file at a smaller percentage. Let's say you have a 1.5 inch sheet, but you want to print it out at .85 inches for scrabble tiles. Divide the size you want by the size you have, then round up to the nearest percentage to allow for trim room, to calculate your printing size:

.85 / 1.5 = .567 (or 57%)


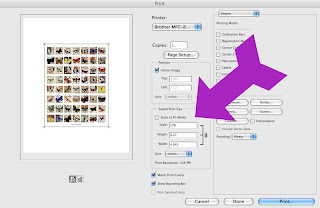
To print a .jpg file out at 57% go to file/print, then change the scale to 57%. Here's a couple of sample print windows (click the images on left to enlarg
e). Basically, you're looking for an option that says "scale" or "print size."

Also, since all piddix images are 300 dpi and high quality, you
can use the same steps to enlarge a whole sheet to two to three times larger as well. However, you'll only get the images in the middle, or it will print onto two sheets while cropping the edges. To avoid missing any of the images, use the steps below to select and enlarge individual images or groups of images.

Step 3. Re-sizing Individual Images

For those of you with a graphic design program, such as Photoshop or CorelDraw, it's fairly straightforward to copy and paste individual elements of a file then re-size them as you'd like. Every program is different, but the basic steps include:
1. Open your piddix .jpg file in your graphic design program.
2. Find and click on the "marquee" or "select" tool. It normally looks like a dotted circle or square.
3. Draw a circle or squ
are around the individual image you want by clicking on a blank space near the image, then holding and dragging until you have covered the whole image.
4. Copy the image.
5. Paste it in a new file.
6. Enlarge or shrink the new image i
n several ways. Most software programs will allow you to click on the new image, then grab one of the corners and drag it to make it smaller or larger. Be sure to hold down the shift key to keep the image the correct ratio so it doesn't get warped.

I also have a free, 5-page step-by-step tutorial with photos that shows you how to do the same thing in MS word. If you're a piddix customer, convo me or email me from the account from which you ordered your piddix files and ask for the re-size tutorial and I'll send you a free copy.

Step 4: Changing the image shape
So far, all of these steps have been good if you want to shrink or enlarge an image while keeping it the same basic shape. But what if you want to change a square into an oval or vice-versa?

One easy way is to find a shape punch in the size you'd like, such as this circle punch from Annie Howes. They're also available in most craft stores and online. Then find a collage sheet that shows a whole image, like these fairies or French fashions and punch away.

You can also make your own, hard-copy stencils specifically tailored to your needs. Let s
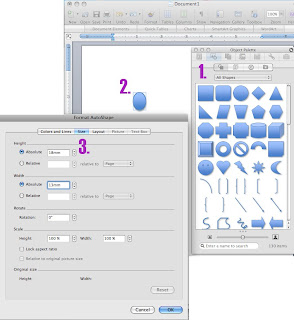
ay you would like to make 13x18mm ovals, and you have a sheet of one-inch squares to start with. First, create an oval the right size in any graphic design software. To do it in word (click on the image at right to enlarge and follow along):
1. Choose a circle from the objects palette and draw it on the page.
2. Double click on the circle. This should bring up the size options.

3. Change the size to 13mm width and 18mm height. You can write in mm and the computer will change it from inches to mm automatically.

Then print your file and get creative. I like to print the oval out on cardstock, then cut it out and put it on top of a printed collage sheet and trace around the edges--like you would with a bottle lid. You can do the same by printing on clear mylar. Or even take your paper oval, put it on top of a recycled plastic (like a clear cookie box lid) and cut the lid out in the same shape. Oh, and be sure to try your new template oval out in the pendant first to make sure it fits well and adjust accordingly.

Monday, May 11, 2009

Help Me Pick Colors and Win 20+ Collage Sheets

I've been having a blast coming up with new color combinations for my digital collage sheets, but some are definitely better than others. If you help me out by sharing your advice on which color combos you like best, you'll be entered to win every single one of my new collage sheets in my "birds and swirls " and "zen birds" lines (a value of more than $60).

Here's how it works:
1. Sign up for my occasional newsletter here. I'll then send you a link to a sample collage sheet with 10 different color combinations and instructions on how to pick your favorites.
2. One winner will be randomly selected and notified by May 31, 2009.
3. Plus, every person who enters will receive one free high-resolution download of the sample sheet as well.

Thanks for your help!

Tuesday, March 11, 2008

Share the Wealth: Free French Download


I must admit that this is not one of my images, but it still looks pretty fun. It's from Stampington and Company, which has an Angel Policy. Click here for the link to the full sized image.

Sunday, March 9, 2008

Copyright and Digital Collage Sheets

"How does that copyright thing work?" is by far the number one question that I am asked concerning digital images and collage sheets. While I am not a lawyer, I have spent quite a bit of time working with my lawyer and educating myself on copyright laws. So I'll tell you how I work with copyrights when creating my collage sheets.

Copyright basics:Almost everything that was published in the United States before 1923 is in the public domain in the United States. "Public Domain" means the copyright is no longer owned by anyone, (it's owned by the public), and thus you can do just about anything with the images, including sell them for profit. This is why, in part, so many of the images that you may see for sale are "vintage," because this is the easiest category to find items that you can sell.

From 1923 to 1978, a published document, such as a book, was required to have a copyright notice in order to be copyrighted (with a few exceptions). This is often why you'll see digital items from the 1940s or 1950s for sale such as seed packets or greeting cards that did not tend to have copyright symbols on them. However, the images and the published words are copyrighted separately. So you have to research the image itself even if the book is in the public domain. This makes sense if you think about your own work of art. Let's say you make a painting of a tree and another esty seller wants to make pocket mirrors from your painting. You set up an agreement that allows her to make and sell these mirrors, giving you a portion of each sale. You, however, retain your copyright to the original image that you created. Thus, the pocket mirror and the original tree image have separate copyrights and might have different copyright status.

An item from 1923 to 1978 may also have fallen into the public domain if it was originally published with a copyright notice but the copyright was not renewed. Images from this time period are much more difficult to confirm. My 1950s pin-up girls took 6 months to research, and that does not even include the time it took to make the pictures into sheets.

From 1978 on, the majority of published material is still copyrighted. So unless I've taken the photographs myself, I tend to avoid the newer images.

It's not quite as cut-and-dry as it seems above, which is why I can take days if not weeks to determine the status of one image, but these general boundaries are a great starting point. The U.S. government has a thorough PDF that outlines many of the rules and the exceptions to the rule.

Terms of Usage
The other aspect to consider is "terms of usage." This basically means that even if a piece of art or illustration is in the public domain, such as the Mona Lisa, the organization that owns the art may limit what you can do with it. Last summer, for example, I visited the Minneapolis Institute of Art. They allow photographs of their entire collection, so I was happily taking photos of this amazing, ancient collection of tapestries. Upon contacting them to confirm that I can use these images, however, I learned that while I may take photographs, I may not use these photos for commercial purposes. Basically, by entering the building, I agree to their terms of usage which says what I may or may not do once I enter the building. If I do not agree to abide by these terms, I cannot enter the building.

This is the same concept that works with digital images and many websites. A museum may have images of their art on their website, even art that is in the public domain. But this does not mean that you can use these images however you want. If you look at the bottom of the webpage you will often see a "terms of usage" that spells out what you can and cannot do on that website.

Similarly, when you buy an image or image collection from someone, you are agreeing to their terms of usage.

Derivative Works
One additional concept that comes in handy in understanding digital images is "derivative works." These are brand new works that are made up of many other images and are thus able to be copyrighted. Collage is the most common derivative work. If you take, for example, several public domain images and create a new collage work, you may copyright your new work. This also works for collage sheets, where I've taken dozens of different public domain images and made them into a new work that I thus copyright.

Derivative works can be tricky however if you attempt to make something like a collage out of copyrighted material. I've often heard people say that as long as they are using an original item instead of a copy, they can do whatever they want to with it. The theory is that I can take an ad from 2008 or a children's book from the 1950s and make it into something else as long as I use the original. In my research this is often not true. According to title 17 of U.S. copyright code, only the owner of the copyright may grant permission "to prepare derivative works based upon the work." FunnyStrange has a series of excellent articles on collage and copyright that explore these ideas further.

But wait there's more
Finally, there's several other concepts that can come into play: trademarks, logos, and "right of publicity." So no, even if a Coca Cola ad was published before 1923 in the U.S., you may not be able to use it if it contains the Coca Cola symbol or trademark. Same for that photograph that you personally took of Paris Hilton (or even people who are no longer alive like Elvis or Marilyn Monroe). Without their permission or the permission of their families, you may not be able to use their likeness. And to complicate matters, rights of publicity often vary from state to state. In the case of Marilyn Monroe, there's debate over which state's laws apply, and thus whether her likeness is able to be used freely or not.

After all of this you may start to wonder how anyone can make anything at all! Needless to say, many, many people do not follow these rules, including many on etsy. But if you're reading this, you're probably interested in doing things "the right way." Hopefully these basic guidelines can give you a good start to understanding copyrights and how they relate to collage sheets and crafting.

Thursday, February 14, 2008

Instant Downloads are Finally Here -- Valentine's Day 50% Off Special

It took way longer than expected, but I'm finally getting instant downloads set up for my digital collage sheets. Yea! I'm excited because I did a ton of research and found a nice system that allows true "instant downloads" instead of an autoresponder email with a link. The whole process skips email completely.

see:: www.instantcollagesheets.com

It' new, it's kind of ugly (I still need to overwrite the pre-set template colors), and I've only put up about half of my collage sheets, but if anyone wants to try it out, I'll send you a coupon for 50% off to be my tester for the month of February. 

Send me an email at piddix@gmail.com and I'll send you a coupon.

Thanks everyone.