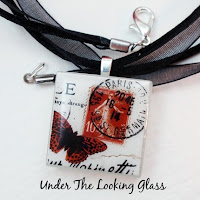
 Digital collage sheets by piddix are 8.5x11 inch .jpg files delivered to your email within 24-hours. Most people print them out as-is, cut out the individual images with scissors, and then use them to make beautiful pendants, collages, cards, and other jewelry (see lovely example from Under the Looking Glass on left).
But what if you want an image to fit a particular size or shape that is not offered? With four pretty easy tricks, you can re-size just about any image offered through piddix to fit your needs.
Step 1: Know your "mms"
Many pendant settings are listed in millimeters, while some collage sheets are only listed in inches. One mm equals .039 inches. So to find out a good size for the 25mm pendant tray you just ordered, multiply 25 by .039 to equal .98 inches--so the one inch circle or one inch square sized collage sheets will be the best fit. Here's an online calculator to find the same answers.
Step 2: Use your printer to re-size
One of the ea

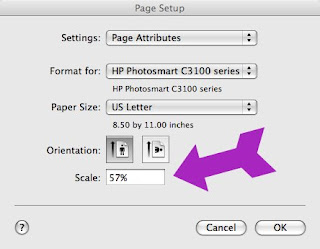
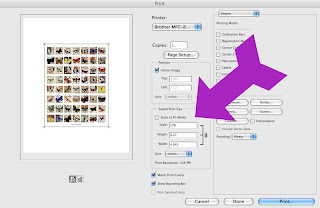
 siest ways to re-size an entire sheet is to print the whole file at a smaller percentage. Let's say you have a 1.5 inch sheet, but you want to print it out at .85 inches for scrabble tiles. Divide the size you want by the size you have, then round up to the nearest percentage to allow for trim room, to calculate your printing size:
.85 / 1.5 = .567 (or 57%)
To print a .jpg file out at 57% go to file/print, then change the scale to 57%. Here's a couple of sample print windows (click the images on left to enlarge). Basically, you're looking for an option that says "scale" or "print size."
Also, since all piddix images are 300 dpi and high quality, you can use the same steps to enlarge a whole sheet to two to three times larger as well. However, you'll only get the images in the middle, or it will print onto two sheets while cropping the edges. To avoid missing any of the images, use the steps below to select and enlarge individual images or groups of images.
Step 3. Re-sizing Individual Images
For those of you with a graphic design program, such as Photoshop or CorelDraw, it's fairly straightforward to copy and paste individual elements of a file then re-size them as you'd like. Every program is different, but the basic steps include:
1. Open your piddix .jpg file in your graphic design program.
2. Find and click on the "marquee" or "select" tool. It normally looks like a dotted circle or square.
3. Draw a circle or square around the individual image you want by clicking on a blank space near the image, then holding and dragging until you have covered the whole image.
4. Copy the image.
5. Paste it in a new file.
6. Enlarge or shrink the new image in several ways. Most software programs will allow you to click on the new image, then grab one of the corners and drag it to make it smaller or larger. Be sure to hold down the shift key to keep the image the correct ratio so it doesn't get warped.
I also have a free, 5-page step-by-step tutorial with photos that shows you how to do the same thing in MS word. If you're a piddix customer, convo me or email me from the account from which you ordered your piddix files and ask for the re-size tutorial and I'll send you a free copy.
Step 4: Changing the image shape
So far, all of these steps have been good if you want to shrink or enlarge an image while keeping it the same basic shape. But what if you want to change a square into an oval or vice-versa?
One easy way is to find a shape punch in the size you'd like, such as this circle punch from Annie Howes. They're also available in most craft stores and online. Then find a collage sheet that shows a whole image, like these fairies or French fashions and punch away.
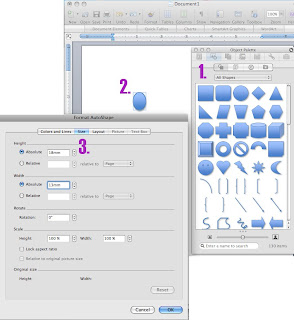
You can also make your own, hard-copy stencils specifically tailored to your needs. Let say you would like to make 13x18mm ovals, and you have a sheet of one-inch sq
 uares to start with. First, create an oval the right size in any graphic design software. To do it in word (click on the image at right to enlarge and follow along):
1. Choose a circle from the objects palette and draw it on the page.
2. Double click on the circle. This should bring up the size options.
3. Change the size to 13mm width and 18mm height. You can write in mm and the computer will change it from inches to mm automatically.
Then print your file and get creative. I like to print the oval out on cardstock, then cut it out and put it on top of a printed collage sheet and trace around the edges--like you would with a bottle lid. You can do the same by printing on clear mylar. Or even take your paper oval, put it on top of a recycled plastic (like a clear cookie box lid) and cut the lid out in the same shape. Oh, and be sure to try your new template oval out in the pendant first to make sure it fits well and adjust accordingly.


7 comments:
wow... great info... thanxxxx corinna, marionjoy
Thanks so much marionjoy. Glad you liked it. Although, Ms. Photoshop Wiz, probably nothing new for you.
Best,
C
Oh my gosh, you are amazing. You've saved me sooo much researching and time with this info. Thank you!
THANK YOU...THANK YOU....THANK YOU...!!!!!!!!!!!!!!!!!!!! You are too nice to share this. I know I can't be the only person who doesn't know how to do this ( at least I hope not !!)..opens up a whole new world of creative ideas for me.
I am so glad you both found this helpful. So many people have asked about re-sizing, and it can be so hard if you don't have something like Photoshop (and sometimes, even if you do), so that's why I put it together. I hope it all works and makes sense.
Thank you for generously sharing such detailed and technical information. I really appreciate it.
Thanks so much cinnamonpink. And I have to say I just spent waaay too much time exploring your blog (I should be working). It is absolutely lovely.
Post a Comment